Summary: Through this blog, we will share some basics about the OST files. In addition, explain to you the way to import OST files to Outlook through the manual method and the third-party converter tool.
Imagine a situation when you need to access the data but because of the unavailability of the internet, checking data is impossible. Thanks to the OST file which gets created by Outlook when configuring Outlook profile with Exchange server. OST files help users to access data even without the internet. However, the user cannot import OST files to Outlook directly, which creates the need for the OST file to PST conversion.
This technical guide will solve the problems of many Outlook users as we will be explaining the manual and the professional conversion solution.
What are Offline Storage Table files?
OST files are formed whenever the user starts creating their Outlook profile and configuring it with the Exchange. These files generally allow users to view the content even without the Internet. If the users want to import OST files to Outlook directly, it is impossible. However, Offline Storage Table files to PST conversion can solve the user problem.
Many users also don’t know the exact location of the OST files. So if you are using Windows 10, then the location of these files will be in
<Drive>\User\<Username>\AppData\Local\Microsoft\Outlook
If we look at a conversion solution, the user can do it through the Outlook Import/Export option, and a third party. Firstly, we will quickly review the manual solution.
Procedure of Converting OST files into PST files
As we have already informed you, the user cannot import OST files to Outlook, so the alternative route to access OST data in Outlook is to convert them into PST files. Below given is one of the manual methods which can make it possible.
Before moving towards the working process of this method, we would like to inform users that the system should have an Outlook and an active Outlook account.
Note: – This method cannot convert the orphanage OST files.
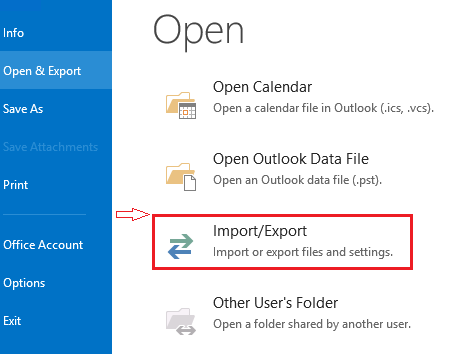
Method: – Outlook Import/Export
- First of all, the user needs to launch the Microsoft Outlook application.
- Then move to File and select the Import/Export Option.
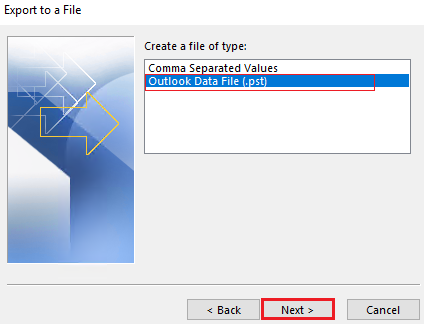
- From the Import & Export wizard, pick “Export to a file” and click Next to continue.

- Here, Select Outlook data file (.pst), then hit the next button.
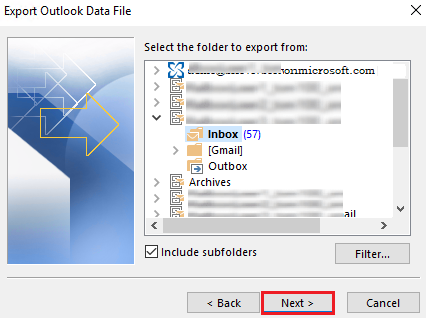
- Select the folder from which you need to export. After selecting, click the following button.
- Choose the location where you need to save the PST file. Also, the user can choose any one option from the list of all. Click the Finish button to end the process.

The Outlook, Import/Export method is free, but it has multiple limitations, which does not make it an ideal conversion method. We have listed some of its drawbacks which the users can check below:
- Sometimes the conversion causes corruption in the resultant PST file.
- It takes more time to convert files compared to third-party professional software.
- Not capable of handling conversion of large-size OST files.
- This method cannot convert the corrupted OST file.
Professional Solution to Convert OST into Outlook PST
Indeed, the user cannot convert the corrupted OST files into the PST file format with the help of manual methods. Various other limitations of manual conversion solutions create a need for third-party software.
Users can look at the Shoviv OST to PST converter, which overcomes all manual method downside. It is easier to import OST files to Outlook, but the user needs to convert the OST into PST. Let’s check how this software works before explaining to you its benefits:
- Firstly, the user must install the converter and open the software into the system.
- Now choose Add OST file option from the software ribbon bar.
- After selecting OST, click on the advance scan option to check the status of the OST file.
- Now, from the ribbon bar, click on OST to PST option.
- Once you click on the conversion button, the software allows Check/Uncheck folder & subfolder option.
- Choose the location to save the Output file, and the user can also use the software filter option to add/remove the particular file.
- In the end, click the Next button to start the conversion process.
Software Key features:
- The software allows converting the large size and multiple OST files simultaneously.
- It offers a better user interface, making it even easier for non-tech users to use the software.
- Incremental export feature of the tool is one of its key functionality, which resumes the interrupted conversion process.
- It even repairs the highly corrupted OST files and converts them into PST file format.
- Besides the PST file format, the software allows saving the OST file into HTML, vCard, EML, and other file formats.
- The tool will efficiently work with all Windows Operating systems and Outlook editions.
Wrapping Up
OST is an important file that allows users to access their data even when there is no internet connection. In this technical guide, we have demonstrated how to import OST files to Outlook indirectly through the Outlook Import/Export option and third-party software. As we all know that it is impossible to open the OST into Outlook, so the best option is to convert them into PST. If you at the solution, due to the multiple drawbacks of the manual conversion solutionlooking toward it does not makes sense.
Instead utilizing the third-party professional software is much better option.